First, open the property tag program
There are several ways to start the property tagger:
(1) Start SolidWorks 2013 and select [Property Label Compilation] in [Task Pane] > [SolidWorks Resources], as shown in Figure 1.
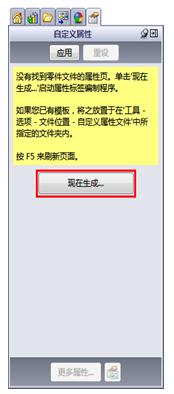
Figure 1 Attribute labeling program in the task pane
(2) Click the Windows [Start] menu > [All Programs] > [SolidWorks 2013] > [SolidWorks Tools] > [Property Tab Compiler].
(3) If there is no custom attribute label template in the path in the [Tools] > [Options] > [System Options] > [File Location] display folder [Custom Properties File], you can also When opening a SolidWorks file, click [Generate Now] on the Custom Attributes tab of the SolidWorks task pane, as shown in Figure 2.
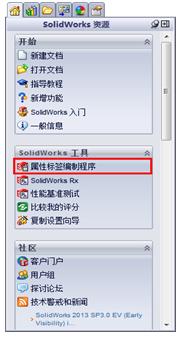
Figure 2 Custom properties in the task pane
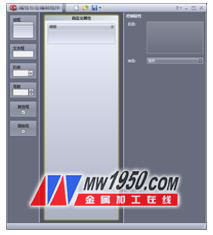
Figure 3 attribute labeling program
The interface after the property tag program is opened is shown in Figure 3. Custom property interfaces can be created for parts, assemblies, drawings, and weldments. This article uses the creation of a part attribute label template as an example to introduce the use of the attribute labeling program. Readers can create assembly and drawing as well as attribute label templates for weldments as needed.
Second, the attribute labeling program
The main interface of the attribute labeling program consists of three parts. As shown in Figure 4:
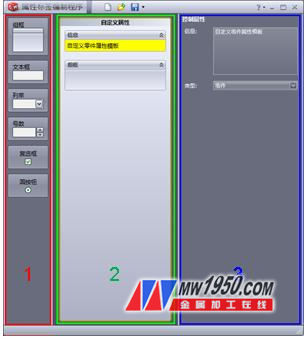
Figure 4 Attribute Label Compilation panes
The left pane 1 is a control palette, and includes control units such as a group box, a text box, and an enumeration;
Center pane 2, you can drag the group box to the center pane, drag the unit to the group box in the center pane, a golden border around the active unit, the unit's properties appear in the right pane, you can Set its properties;
In the right pane 3, you can set the properties of the group box and other units. By default, you can set the page hierarchy property of the property label template, specify the type of the property label template being generated (part, assembly, or drawing), and Generate a message that appears at the top of the label.
Group box:
An attribute label template can contain multiple group boxes, which can be grouped by group box. After selecting the group box, a golden border appears in the group box, you can set the title of the group box in the right pane, and whether the group box is expanded or collapsed by default. As shown in Figure 5.
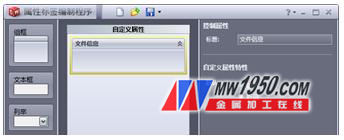
Figure 5 group box properties
Text box:
Drag the text box unit into the group box. Set the title of the text box unit in the right pane. (It is recommended to set the unit title and custom attribute name to be the same.) Enter a custom attribute name in the name, such as "file serial number", type "text", and the value field is blank. As shown in Figure 6.

Figure 6 text box unit properties
"Show on custom tab" and "Show on configuration specific tab"
The button control custom properties are the custom tabs that appear in [File] > [File Properties], Summary Information dialog box or configuration specific tabs. I recommend setting the custom properties in the "Configure Specific Tabs".
List:
Drag the enumeration unit into the group box. Enter a custom attribute name in the name, such as "Customer Name", select "List" in the type, and enter the name of the customer in the value.
Check "Allow custom values" so that
You can manually enter content when you enter properties later. As shown in Figure 7.
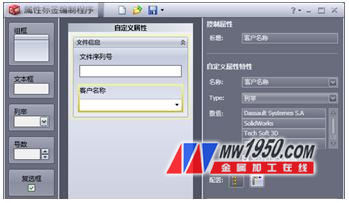
Figure 7 lists the cell properties
In addition, you can set the type to "Text File", "Excel File", and "Access Database" so that you can
To link custom properties to these external files.
Add a custom attribute "Spare Parts Information", select "List" for the type, and the values ​​are "Homemade Parts" and "Purchase Parts". Usually, when the spare parts information is “purchased partsâ€, the spare parts information of the purchased parts, such as “purchased part number†and “supplierâ€, will be filled in.
Add another group box, and add a text box unit and enumeration unit in the group box, and set their custom attributes to "purchased part number" and "vendor" respectively.

As shown in Figure 8.
Figure 8 Adding spare parts information
Checkbox:
Drag a check box cell in the left pane and place it under Spare Information. The checkbox controls which units are available in the SolidWorks Custom Properties interface when checkboxes are checked and unchecked.
In the advanced options in the right pane, in the check selection box, select the "Purchase Order Group Box", "Purchase Part Number" unit, and "Supplier" unit. After this setting, when the "Purchase Information" check box is checked in the custom attribute, the Purchased Items group box appears, and then you can enter the "Purchase Part Number" and "Vendor" attributes to the SolidWorks part. In the file. As shown in Figure 9.

Figure 9 Add checkbox unit
Add a group box and set its header information to material data. As shown in Figure 10.
Add a text box unit and set its custom attribute name
For "Material", select "Text" for the type, and select "[SW-Material] from the list. Use the same method, add a text box unit, set its custom attribute name to "weight", type selection
"Text", the value is selected from the list "[SW-Quality].
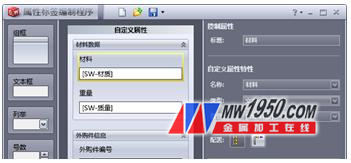
Figure 10 Add material group box and adjust group box
Group boxes can be adjusted to show their position by dragging, or you can drag custom attributes from one group box to another.
Once you have created the above part attribute label template, click the Save button to save the part attribute label template. The save path is the same as the path in [Tools] > [Options] > [System Options] > [File Location] to display the folder [Custom Properties File] of the following item.
In addition, readers can add other custom attribute information as needed, or create attribute label templates for assemblies and drawings. The method is similar to the method of creating a part attribute label template, which I will not repeat here.
Third, the use of attribute label templates
If [Tools]>[Options]>[System Options]>[File Location] displays the folder specified in the [Custom Properties File] folder of the next item, there are multiple attribute label templates of the same type, then open the SolidWorks file. After that, you can select a property template in the Custom Attributes tab of the task pane as needed. As shown in Figure 11.
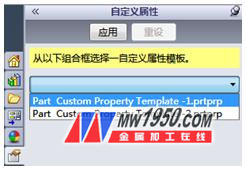
Figure 11 Selecting different attribute label templates
Add a custom attribute, then click the [Apply] button at the top of the Custom Attributes tab, the attribute will be quickly written to the corresponding SolidWorks file, as shown in Figure 12. Click File > Properties to view the configuration-specific properties in the Summary Information dialog. As shown in Figure 13.

Figure 12 Custom Attributes tab

Figure 13 summary information dialog
The attribute label template can also be replaced by clicking the [Click to get template option] button in Figure 12, as shown in Figure 14.
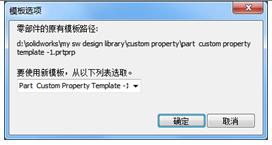
Figure 14 Replace the attribute label template
Open a SolidWorks assembly file. When you select any component or assembly in the FeatureManager design tree, you can enter properties for the assembly through the Custom Properties tab of the task pane. Alternatively, you can click the part or assembly icon in the FeatureManager design tree and add attribute values ​​to it in the Custom Attributes tab.
If the part or assembly uses the same file template, you can also select the part or assembly in the FeatureManager design tree, in which case you can add common attributes to multiple parts or assemblies at the same time. As shown in Figure 15.

Figure 15 adds attributes to multiple parts simultaneously
to sum up:
SolidWorks property taggers can be used to generate custom part, assembly, and drawing property tag templates, and you can fill in frequently entered content in list cells, which greatly reduces the amount of work required to enter custom properties and reduces errors. To improve work efficiency. I hope that the above content can bring some help to everyone's work. For more usage and skills of the SolidWorks property tagging program, you can also contact the author directly by email. I am very happy to share and share with the readers using SolidWorks. Experience.
About Shiwei
Established in 1997, Shiwei International (Taiwan stock code: 8416), with complete product lines such as CAID, CAD, RP, RE, CAE, CAM, PDM, cooperates with consulting and customized services, and provides R&D, design and manufacturing. Complete solution. Rich tutoring experience, coupled with high-quality software and hardware, and senior team consulting and training courses, has so far coached more than 5,000 companies in Taiwan and mainland China, providing solutions to customer needs and helping the industry to enhance competitiveness. Shiwei International Headquarters is located in Neihu, Taipei, and has service bases in Hsinchu, Taichung, Tainan, Kaohsiung, Shanghai, Dongguan, Ningbo, Tianjin, Jinan, Nanjing, Suzhou, Xiamen and Shenzhen.

5.29~6.7, participate in the 2013 SolidWorks Solution Day, and Shiwei will solve your problems in 9 major cities!
Event registration: http://
Hebei Xinteli mainly deals with Metals & Hardware products business over ten years. We have much experience in producing and exporting Metal & Hardware products. Our products are organized into five categories: Wire Mesh ; Iron Wires; fence, post &accessories; Nails ; Wrought Iron Products. Wire mesh, also known as wire netting, is amazingly versatile and is easily adapted to almost any application. Xinteli offers a wide selection of woven and Welded Wire Mesh products with various mesh size, openings, thickness, and materials. Fence, post and gate are widely used in Commercial grounds, like: corporation, hotel, supermarket; Private grounds, like courtyard, villadom; public ground, like park, zoo, train station; Road, like highway, railway. Wrought iron products are perfect for decoration, it makes your life more beautiful. Iron wires and nails can be used both in industry and residential area. Possessing tons of experience in manufacture and export, We are a professional partner for international distributors.

Metals & Hardware Products,Cnc Metals & Hardware Products,Metal Brass Hardware,Stainless Steel Rigging Hardware
Hebei Xinteli Co., Ltd. , http://www.sinohardwares.com